Establish Static Website Using Hugo, Render, Cloudfare and Improvmx
Let me kick off this blog by telling how was it built.
With the various static websites frameworks and infrastructure services out there, there are quite a lot of ways one can take to make a blog. The good thing about the one I’m going to describe is that it costs nothing 😄 completely free*.
* As long as the providers stick to their word and keep the services free.
* It’s not 100% free, you have to pay for a domain, there’s no way to get around this
This is an overview of the setup I went for:
Let’s dig deeper into each one.
1. Framework
Hugo is a framework for building static websites, it’s built on Go Programming Language which means it’s fast 😄, I won’t go into details of how to start with Hugo - you can check their Quick Start Guide - but I will say why did I choose it over other Frameworks.
I was considering basically three options Hugo, Jekyll and Gatsby
Gatsby
:plus: Pros:
- It’s a framework to build any kind of websites, not just static ones, it’s built on Node.js and React and uses GraphQL as a data layer which provides a unified way of retrieving data for your website whether it’s some static images stored locally or product data that come from Shopify APIs for example!
- It has numerous plugins (2000+ according to their website) and since it’s based on React this means you can also use React components after some fitting.
:minus: Cons:
- IMHO all those advantages are disadvantages for the purpose of building a static website, it’s simply an overkill for such use-case, to give you an example this is how to include an image into one of your posts:
export const query = graphql`
  query {
    fileName: file(relativePath: { eq: "images/myimage.jpg" }) {
      childImageSharp {
        fluid(maxWidth: 400, maxHeight: 250) {
          ...GatsbyImageSharpFluid
        }
      }
    }
  }
<Img fluid={data.fileName.childImageSharp.fluid} alt="" />
https://www.gatsbyjs.com/docs/working-with-images/
Compared this to Hugo:

Jekyll
Built on Ruby, to be honest it’s quite good; easy to setup, uses markdown, and has lots of plugins, being the oldest framework amongst Hugo and Gatsby.js means that there’s already lots of resources out there.
Myself being a Ruby developer means that I’m quite comfortable with customizing it, that being said the main reason I didn’t go for it is I wanted to learn a new framework.
Hosting
There is a wide range of free services for hosting a static website, the one which I picked is Render, it’s a cloud that can host web apps and for static apps it’s free.
- It connects to your Github repo and automatically deploys on push events to pre-defined branch.
- Easy to setup, you can check Host on Render or Deploy a Hugo Static site for detailed setup guide.
You’ll end up with your blog running on <something>.on-render.com
Note: Render allows you to have a custom domain plus a free SSL certificate, so you can set that up Render DNS Setup and stop here, but unfortunately it doesn’t enable you (the free version at least) to add
MXDNS records; which enables you to have emails @ your domain.
In order to have professional emails as well (e.g. info@ your domain or me@your domain) we’re going to use another service to manager our DNS records; Cloudfare
DNS Provider
Cloudfare is a service that provides different things for your application and infrastructure, such as DNS management, Firewall (DDoS protection) and Analytics services.
A lot of those services are free 😄, we’re going to use the DNS Management service.
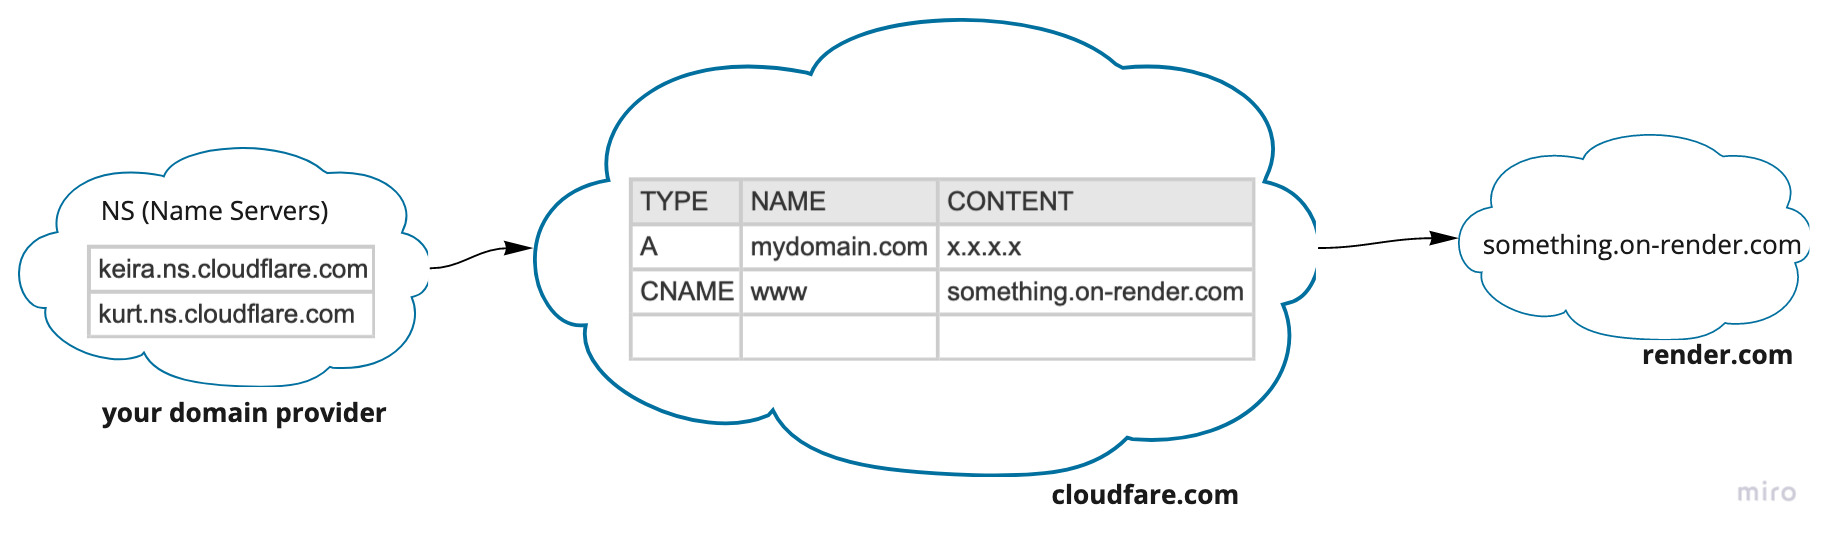
- Point you domain provider to use Cloudfare as a Nameserver; i.e. tell it that Cloudfare is going to manager your DNS records
Search in the interface of your domain provider for “Nameservers”, there add the name servers for Cloudfare.
keira.ns.cloudflare.com
kurt.ns.cloudflare.com
- Create
AandCNAMEDNS records that should point your visitors to the hosted Render app
A Record: (Address Record) this is the most fundamental DNS record, it indicates the IP of a given domain, value MUST be an IP Address (typically IPv4).
| Type | Name | Content |
|---|---|---|
| A | @ (or your domain) | x.x.x.x |
Where:
x.x.x.xis the IP of Render@name refers to the root of your domain
This matches your domain http(s)://yourdomain.com to the IP of Render
CNAME Record: Alias record, a domain or sub-domain aliases to another domain, value MUST be a domain it can’t be an IP Address.
| Type | Name | Content |
|---|---|---|
| CNAME | www | something.on-render.com |
This basically redirects anyone accessing http(s)://www.yourdomain.com to something.on-render.com.
Usually you add those two records - A and CNAME - so that your web site is reachable via http(s):// or http(s)://wwww.
- Enable SSL/TLS encryption (it’s free) so that your website is accessible via
https://
Now https://yourdomain.com should be up and running. Next step would be setting up a professional email where you receive emails to xxx@yourdomain.com.
Note: Some Domain providers provide DNS Management services (
A,CNAME,MXandTXT) and SSL certificates for free, if this is your case you can just use those services.
Emails
Improvmx is a free email forwarding service and it allows you to create email aliases for your domain e.g. info@yourdomain.com
Note: Zoho Mail is another service that allows you to have email aliases for your domain, you get actual mailboxes so you don’t need to forward the emails. The only reason I didn’t use it is that I already have two accounts (with two different emails 😄) and I didn’t want to create a third one. Otherwise I would’ve gone for it.
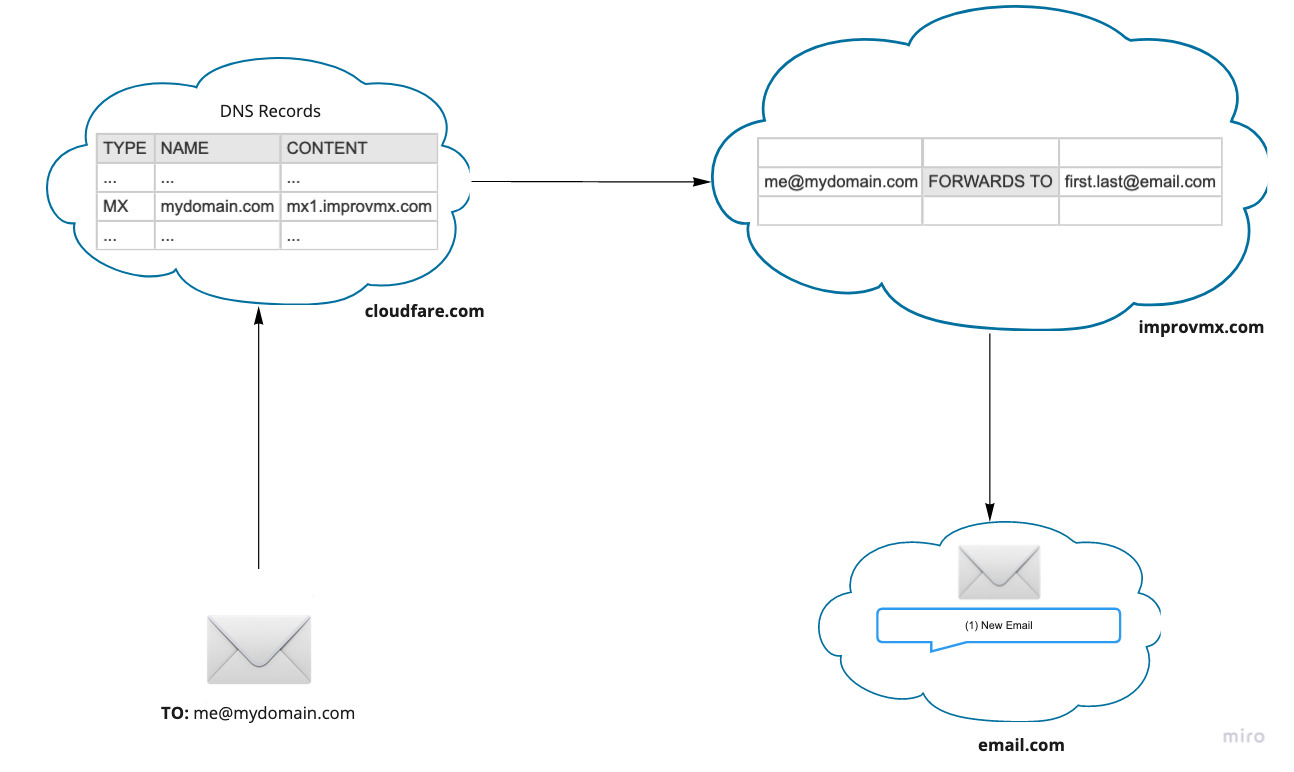
Start by adding your domain and the target email on Improvmx, then add the DNS records; MX and TXT; to your DNS records; on Cloudfare if you were following this guide.
Test the setup using Improvmx “Test” button or try sending emails to your newly created alias.
Et voilà! Now you established a basic static website with your own domain name and email aliases.
I hope that you liked this post and stay tuned for more to come.